Proxmox and ddwrt w/ differing subnets error

Some background: I run a small software consulting firm, but I’m also a family doc and I keep a few thousand pages of clinical notes in a semantic mediawiki (“NotesWiki”) that I host on my own servers. I wanted network redundancy of this NotesWiki so I enlisted my parent’s network 150 miles away. On my parents network I installed a proxmox VM server and placed the VM server on a separate subnet from my parents local subnet. There are lots of ways to do this using debian/Proxmox, but I decided to use a ddwrt router as the subnet separation point (me7). See drawing below for an explanation of my network.

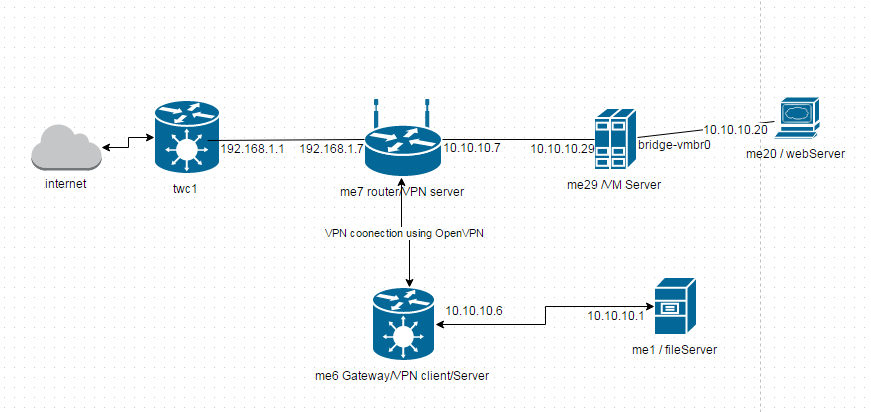
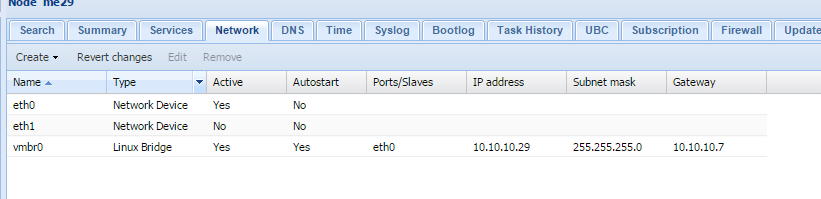
This setup seemed easy enough but for some reason I could not direct network traffic from the internet to me20 (the webserver) despite correct port forwarding in twc1. After days of pinging, packet watching w/ wireshark, and pulling my hair out, I finally figured out what was going on. me20 is a virtual machine that sits on a proxmox VM Server (me29). I had set me29’s gateway as 10.10.10.6 (me6) and this meant that packets which arrived at me20 from the internet would take a return path through me6. Obviously this didn’t work.  The solution was to set the gateway to the a more appropriate outgoing route (e.g. 10.10.10.7).  See proxmox config image below.
proxmox setting

I hope this post saves someone else the frustration I experienced.

Posted in Debian, networking, Proxmox, Virtualization | Leave a comment

Alt-Tab in Citrix XenApp Remote Desktop

A number of enterprise health systems allow access to a shared EMR virtual server via XenApp.  It’s a nice way of separating concerns and enforcing security, however, there are a few configuration drawbacks.  One issue I ran into was the lack of windows quick-key functionality in remote windows desktops hosted on a XenApp server.  There is a solution though.  See this link for more info.  I run a windows 7 64 bit host system, so I needed to change the registry value at:

HKEY_CURRENT_USER\SOFTWARE\Wow6432Node\Citrix\ICA Client\Engine\Lockdown Profiles\All Regions\Lockdown\Virtual Channels\Keyboard

“TransparentKeyPassthrough”=

to equal “Remote” for Alt-Tab to work correctly on my system.  The value was blank prior to me adding the text “Remote”.

Posted in networking, Virtualization, Windows, Xen | Leave a comment

RDP tunneling

The Microsoft terminal server client and its associated Remote Desktop Protocol (RDP) is definitely one of the few reasons I still develop on a windows system. In many ways it’s a very clean and efficient protocol that just plain works. But often I’ve found myself behind corporate routers that have blocked the rdp ports (i.e. 3389). Because of this issue I have had to resort to tunneling the rdp traffic over ports that are not blocked by corporate routers.  Also, since RDP isn’t secure, I needed a way to encrypt my remote sessions.  The steps below explain how to tunnel rdp traffic over ssh’s ports (usually port 22).  To do this you’ll need some cheap hardware, free software, networking knowledge, and time.

PreRecs:

  1. A home network router with your/the ssh port forwarded to a machine in your home network.  The machine you forward to will be called the ssh server.
  2. A machine in your home network that is running an ssh server to accept the forwarded ssh traffic.  Alternatively, if you have a dd-wrt router, your router can function as the ssh server.
  3. A windows machine on your home network with its remote desktop server configured to accept clients.  This can be the ssh server machine, but I would recommend having a ssh server that is distinct from the windows/rdp machine.
  4. A basic understanding of network forwarding and protocols.  A bonus would be if you have linux/unix experience.

Instructions:

  1. If these above configurations are in place, then the next step is to install putty, or  a similar ssh client, on your work/remote windows machine.   If you’ve never heard of Putty, it’s a bit like a swiss army knife for network traffic manipulation, and definitely work checking out (see: http://www.chiark.greenend.org.uk/~sgtatham/putty/)
  2. Set up a connection to your home network.  This is done by entering your home ip address (i.e. the ip address of the machine running your remote ssh server) in the uppermost putty text box. Alternatively, you can just enter a host/domain name if appropriate dns resolution exists (see dyndns.org or noip.org for more info)
  3. Configure the tunneling portion of the connection.  This is done by going exploring/expanding the Category tree in putty’s left most window to reveal the Connection–>SSH–>Tunneling options (See image below).  I tend to use a local port 3391 for the connection and rdps default port for the remote connection (3389).  Notice that I’m forwarding my connection to a another computer in my local network (192.168.0.8).  This could be any computer in my local network running windows with rdp enabled.  Click the “Add” button to add your tunnel/forward to the connection.
  4. Click on Session in the category tree to get back to the home screen.  Give your connection a name by typing a name in the Saved Sessions text box.  In the image below I’ve named the connection “twinoaks”.
  5. Click open connection and supply the required credentials when prompted.  I strongly suggest this connection be secured by something more than a password.  Putty does allow for RSA public-private key authentication.  More info on authentication with putty can be found here (link to U of Alberta site).  Once the connection/tunnel is established you should be forwarding all traffic on port 3391 to your ssh port (likely 22)
  6. Establish your rdp connection using Start–> Run–>mstsc–> type “localhost:3391” into the dialog box.
  7. If all goes well you’ll be looking at your remote computer (192.168.0.8 in my case) and your connection will be securely tunneled over ssh.
Posted in networking, Windows | Leave a comment